Thursday, February 12, 2015

Exchange Adjustment - AX 2009

When multiple currencies are used, the exchange rate for the original transaction currency might differ from the exchange rate that is used during the conversion to the accounting currency. To recognize these differences in the exchange rate, the amounts in the main accounts have to be adjusted. The process that is used to make those adjustments is called a foreign currency revaluation or an Exchange Adjustment.

Revaluation can be done in Accounts Payable, Accounts Receivable and General Ledgers. However, the General rule of thumb is to perform the revaluation in the Accounts Payable and Accounts Receivables.

It is not suggested to perform Revaluation for Vendor and Customer Transactions in the General Ledger Module as these transactions will not reflect in the AP and AR modules respectively. Hence, Currency Revaluation is done for Accounts Payable and Accounts Receivables modules.


Prerequisites:

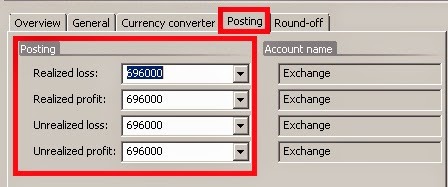
Before you can perform an exchange adjustment, the profit and loss ledger accounts for exchange adjustments must be. This setup is done in the General Ledger

Path: General ledger >> Setup >> Exchange rates >> Posting tab.

These accounts are essential to be setup in case when the organisation is dealing with multiple currencies.
Note: It is not necessary to use the same accounts for all the postings. Multiple accounts can also be used, depending on Company policy.

Revaluation process will generate unrealized gains/ losses whereas Settlement will generate realized gains/ losses.

Once these accounts are setup, the Exchange Adjustment can be carried out. These accounts must be setup for all the currencies that will be used.

Exchange Adjustment:

The procedure to run the Exchange Rate Adjustment is the same in Accounts Payable and Accounts Receivables Modules. The Exchange Adjustment is run from the Periodic Section in both the Modules.

Path: Accounts Payable >> Periodic >> Exchange Adjustment

Simulate an Exchange Adjustment:

Simulation is carried out to analyze the adjustments that will be made to the respective accounts after Revaluation. The simulation generates a report with all the entries and adjustments that will be made when the actual adjustment is carried out.

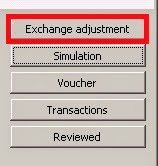
To run a Simulation, click on Simulation Button on the Exchange Adjustment Form
The following parameters need to be selected:
  • Method
  • Considered Date
  • Date of Rate

In the Method field, the following options are available:
  • Standard - Make exchange adjustments based on the Exchange rate used on the date specified in the Date of rate field.
  • Minimum - Make an exchange adjustment if a loss occurs, but not if a profit exists.
  • Invoice date - The program offsets any exchange adjustment that is not already offset, as on the date of Invoice. This causes the transaction being valued at its original value.
The Considered Date is the Date up to which the system has to fetch the “Not Settled” (Open) transactions to perform the exchange adjustment for.

The Date of Rate is the date to be considered for the exchange rate.

The default method is Standard.
The Considered Date and Date of Rate are usually the same date.

After the parameters are selected and the dates are entered, Click on OK.
The Simulation will generate a report with the adjustments that will be made if the Exchange adjustment is run. This report is used to analyze the differences and postings that will be made to the different Vendor/ Customer Accounts. 

Once the postings are verified, the Exchange Adjustment can be carried out.

Run an Exchange Adjustment:

To run the exchange adjustment, click on the Exchange Adjustment button in the form:

The parameters on the form:


Method: Standard
Considered Date and Date of Rate: As required
Use posting profile from: Select the posting profile that is used for the exchange adjustment transactions:
  • Posting – The posting profile of the vendor transaction is used.
  • Select - The posting profile is determined by the posting profile in the Posting profile field.
Posting Profile: If Select is selected in the Use posting profile from field, the posting profile of the exchange adjustment transactions is determined by the posting profile specified in this field.

Select among the posting profiles that have been set up for the company in the Posting profiles form.

Dimension: Select the kind of dimensions that are posted on the exchange adjustment transactions:
  • None - No dimensions are posted on the exchange adjustment transactions.
  • Table - The dimensions of the vendor account are posted on the exchange adjustment transactions.
  • Posting - The dimensions of the transaction that is being adjusted are posted on the exchange adjustment transactions.
Print: Select this check box to print a report with details about this run of the exchange adjustment.
This report is printed on the go and is not saved in AX for future reference.

Transaction Text and Notes: These fields are for Users to enter any remarks or comments regarding the Adjustment.

Click OK to run the Adjustment.

The Exchange Adjustments are now successfully posted.

View Exchange Adjustment Transactions:

Once the Exchange Adjustment is run, the Transactions and the Vouchers posted can be verified.

To view the Ledger Transactions posted by the Exchange Adjustment, select the Adjustment entry that was created and Click on the Voucher Button in the Exchange Adjustment Form.

In order to view the Customer or Vendor Transactions posted by the Adjustment, Click on the Transactions Button on the form.


P.S. Leave your comments below :)

Tuesday, February 10, 2015

Supply Chain Functions


Supply Chain is a broader umbrella of the Trade and Logistics functionality in AX. Here are a few questions that are addressed by the Supply Chain functionality...

Demand Forecasting - 
What is the expected demand in the foreseeable future

Supply Forecasting - 
How much to manufacture/ procure to meet the demands

Product Procurement - 
When to buy, how much to buy, from whom to buy and when to buy.

Transportation Procurement - 
Who will do it, what are the costs

Transportation Planning - 
What will be the routes, the products shipped together, stacking and storage on the transport, stops and pickups on the route.

Transportation Management - 
What are the total costs, minimal cost routes, feasibility, tracking and modes of transport

Trade Compliance - 
Licencing and Legal compliance, trade permits, docking, cross-border compliance

Inventory Management - 
Warehousing, Logistics, Locations, Stocks to keep, Inventory Classifications, Costs, product movement principles, maintenance and expenses, arrivals and issues, counting and tracking

Order Management - 
What is the Order processing time, time to ship/ receive, scheduling orders, blanket orders, subscription management, payments and returns

Customer Management - 
What are the customer preferences, personal details (birthdays, anniversaries), account, shopping habits, experience surveys and ratings

These are just a few queries that are addressed. However, there is an ocean of capabilities where Supply Chain is concerned. All it takes is a little bit of understanding and applying.

Happy Daxing :)

Sunday, February 8, 2015

Transactions in AX

The every day activities of a business are "stored" in the system as transactions. It is these transactions that are summarized to provide the management with a view of the business, what is happening and what is forecast for the foreseeable future.

Every entry in the system is a transaction and these transactions are recorded by a process known as "posting".

A "posted" transaction is one that has been recorded in the system and will reflect the impacts.

Before a transaction is posted in the system, a New Fiscal year must be created. The  Fiscal year must then be divided into periods. No transactions can be posted unless a period is created for the date of posting.

AX posts transactions according to dates as opposed to periods. Each transaction has a posting date attached to it. The dates are the basis for summarizing the transactions in a period/ year.

Periods are equal length intervals in a fiscal year. Usually, a fiscal year is divided into 12 periods, one for each month. These are called accounting periods.

In AX, however, 2 additional periods are created for every fiscal year. These are Opening and Closing Periods. These are used to record the closing and opening balances for the year.

The accounting periods are used to record the daily transactions in the system. No entries can be made in the opening and closing periods.

This is a short summary of a very important process. More details in the posts that follow :)


.

Saturday, February 7, 2015

Transfer Order - Location Selection


Locations are assigned to Items when they are received into the Inventory. If the Location dimension is mandatory, then the location must be specified for all the inventory transactions for the Item.

One of the frequent queries is how the Location dimension is automatically picked by the system - i.e. what is the order of selection and the preference for locations in a warehouse.

To answer this query, consider the following scenario:

Items                      Location                    Quantity
Caps                       A01                                     5
Caps                       A05                                   15
Boots                     B03                                     8
Boots                     B08                                   25

Here, we have 2 items distributed over four Locations. For the purpose of illustration, let us assume that both the items are in the same warehouse. (Please note that the example holds good even if each item is in a different warehouse)

Consider a Transfer Order with the following quantity:

Item               Quantity
Caps                      3
Boots                    2

The system considers the first Location in alphabetical order. In this case, both the locations have sufficient on-hand quantity, so the Items are picked in total from the first available location.

The status of the On-hand quantity for the items after the TO is completed is as follows:

Items                      Location                    Quantity
Caps                       A01                                     2
Caps                       A05                                   15
Boots                     B03                                     6
Boots                     B08                                   25

Note the decrease in quantity at locations A01 and B03.

Now, consider a Transfer Order with the following quantity:

Item               Quantity
Caps                     15
Boots                   10

In this case, the on-hand at the first location is insufficient, but there is sufficient quantity in the second locations (A05 and B08)

The picking happen as follows:

Items                      Location                    Quantity
Caps                       A01                                     2
Caps                       A05                                   13
Boots                     B03                                     6
Boots                     B08                                     4

The quantity is split and picked from two different locations. The system picks the available quantity from the first location, then the remaining quantity from the second location (in ascending order). The system continues to move to the next location until the complete requirement is satisfied.

The On-hand status after the TO is completed is as follows:

Items                      Location                    Quantity
Caps                       A05                                    2
Boots                     B08                                   21

In conclusion: 

The system considers the first location, in ascending order, to pick an item.

If sufficient quantity is available in the first location, the entire quantity is picked from the same Location. If not, the quantity is split and the system picks the available quantity from the first location and then moves on to the next location to pick the remaining quantity. The process continues till the required quantity is picked.

The above illustration pertains to automatic selection of locations while processing a transfer order. However, users have the option of manually selecting the Locations for the items. In such case, the system picks the quantity from the location specified by the user and will prompt in case there is no sufficient on-hand available at the location for the item.

:)